Docket register
Use the docket register to create, view and edit dockets. Import dockets from third party ERP systems. View GPS data and delivery details including proof of delivery. Create customer and supplier invoices.
Choose the Dockets menu option from the left hand menu.
💡 The Dockets menu option may have been renamed in your version of Payloader, for example it could be called:
WorklogsorTimesheets.
On mobile, first click the hamburger menu icon ![]() in the top left of your screen then follow the instructions above.
in the top left of your screen then follow the instructions above.
Docket menus and filters
Click the ![]() icon on the upper right of the screen to display the docket menu.
icon on the upper right of the screen to display the docket menu.
Docket filters
Select Filters to display the docket filters.
Additional filters
Additional filters are also available in the title area of the docket register.
- All: If no filter selected Payloader will search a range of key data fields (eg ID, name, notes etc)
- Source
- Contractor
- Driver
- Vehicle
- Vehicle type
- Document ID
- Run number
Docket views
Toggle between the different dockets views to display summary or detailed docket data:
Docket: Summary view of each drivers docketsDocket lines: A detailed view of each drivers dockets
Import CSV
Import dockets from third party sources in CSV format. Click Select file to browse for the import file, then click Upload to begin the import process. Payloader will log and report back any errors found when attempting to import the data.
Import file column order
Docket import CSV file columns must be in the following order:-
Date, Billing Period, Site, Driver, Vehicle, Vehicle Type, Notes, Tip, Spoil, LineNotes, Qty, CostQty, Hours, DestinationWeight, SourceWeight, VehicleWeight, WbDocketNumber, ExternalRef, AddressStreet1, AddressStreet2, AddressCity, AddressState, Email
Add docket
From the docket register, click the large plus icon ➕ on the right hand side of the docket register to display the Add docket dialog.
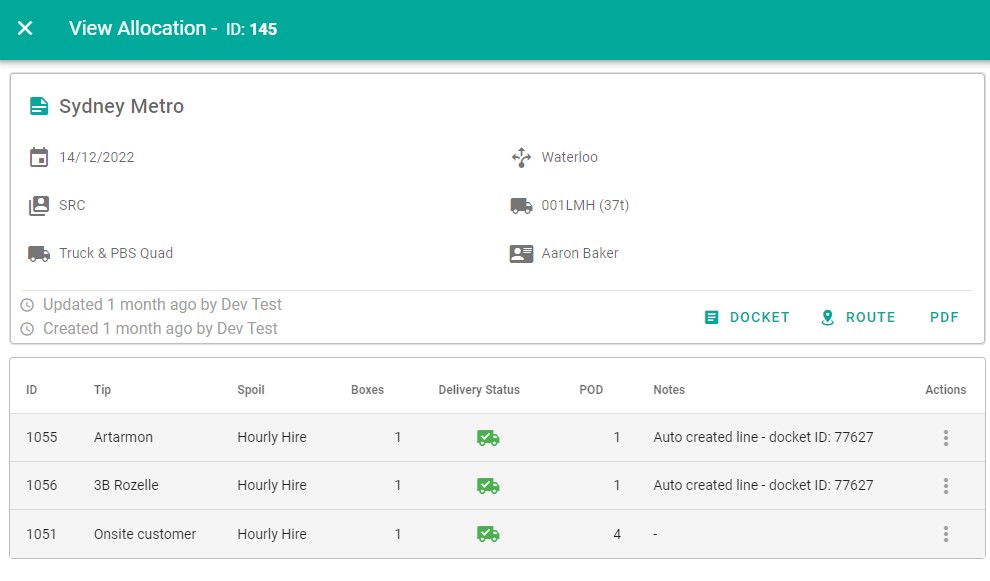
Docket details
Click on the corresponding docket line in the docket register to open the docket details screen.
Alternatively, click the menu icon ![]() at the end of the corresponding docket line and select
at the end of the corresponding docket line and select View details.
Edit docket
When in docket details, click on the pencil icon ✏️ in the top right of the screen to open the Edit docket dialog.
Alternatively, click the menu icon ![]() at the end of the corresponding docket line and select
at the end of the corresponding docket line and select Edit.
Note: The Edit menu or icon will not be available if the document is closed or the current user does not have the correct authority to edit the document.
Delete docket
Click the menu icon ![]() at the end of the corresponding docket line and select
at the end of the corresponding docket line and select Delete. You will be prompted to confirm you choice.
Delete multiple dockets
Select the dockets to delete using the check-box to the left of each line.
Click Select action from the select-box and select Delete selected then click the CONFIRM button.
Click the SUBMIT button to delete the selected dockets or docket lines.
Note: The Delete menu will not be available if the document is closed, currently with a driver or the current user does not have the correct authority to delete the document.
Customise docket columns
See customisation.
Update GPS status
See settings to enable GPS confirmations in invoicing.
Select the dockets to be updated using the check-box to the left of each docket or docket line.
Click Select action from the select-box and select GPS data then click the CONFIRM button.
- Select the GPS data status: Confirm, Review, Unconfirm
- Enter GPS notes if required
Click the SUBMIT button to update the dockets or docket lines.
Update Tipping docket status
See settings to enable Tipping docket confirmations in invoicing.
Select the dockets to be updated using the check-box to the left of each docket or docket line.
Click Select action from the select-box and select Tipping docket data then click the CONFIRM button.
- Select the Tipping docket data status: Confirm, Review, Unconfirm
- Enter Tipping docket notes if required
Click the SUBMIT button to update the dockets or docket lines.
Update Mass declaration status
See settings to enable Mass declaration confirmations in invoicing.
Select the dockets to be updated using the check-box to the left of each docket or docket line.
Click Select action from the select-box and select Mass declaration data then click the CONFIRM button.
- Select the Mass declaration data status: Confirm, Review, Unconfirm
- Enter Mass declaration notes if required
Click the SUBMIT button to update the dockets or docket lines.
Export dockets
Select the dockets to be exported using the check-box to the left of each docket or docket line.
Click Select action from the select-box and select Export selected then click the CONFIRM button.
Select the export type:-
- Export dockets: Predefined column selection
- Export docket lines: Predefined column selection
- Export selected columns: Exports columns currently displayed on the screen
Click the SUBMIT button to export the dockets or docket lines.
Print docket report
Select the dockets to include using the check-box to the left of each docket or docket line.
Click Select action from the select-box and select Print selected then click the CONFIRM button.
Enter the report title if required.
Enter the report type if required.
Select page details: Landscape/Portrait and page size.
Select the print type:-
- Print dockets: Predefined column selection
- Print docket lines: Predefined column selection
- Print selected columns: Prints columns currently displayed on the screen
Click the SUBMIT button to print the dockets or docket lines.
Docket charts
See Docket charts
Show GPS data
Click the menu icon ![]() at the end of the corresponding docket line and select
at the end of the corresponding docket line and select Show GPS to jump to the map view and display either live or historical location data.